Google Drive API Setup for Laravel 11 Integration (Part 1)

January 24, 2024 · 4 min read

2025 UPDATE
Note:
Our previously published guide on Google Drive integration with Laravel has become our most viewed blog post, showing that there’s a big interest in cloud storage solutions within the Laravel community. Because this topic is so important and people need up-to-date information, we’ve written this new version of the guide for Laravel 12.
Setup Google Drive API for Laravel 12
Integrating cloud storage like Google Drive with web apps is getting more common. Laravel, a powerful PHP framework, lets you integrate with different services, including Google Drive, to add more features to your apps. In this guide, we’ll show you how to connect Google Drive storage with Laravel 12, step by step. By the end of this tutorial, you’ll have your Google API credentials and know how to use them with Laravel Storage, offering more options for your app.
Getting your Client ID and Secret
To start, sign in to your Google Account and go to the Google Developers Console at https://console.developers.google.com/.
Creating a new project
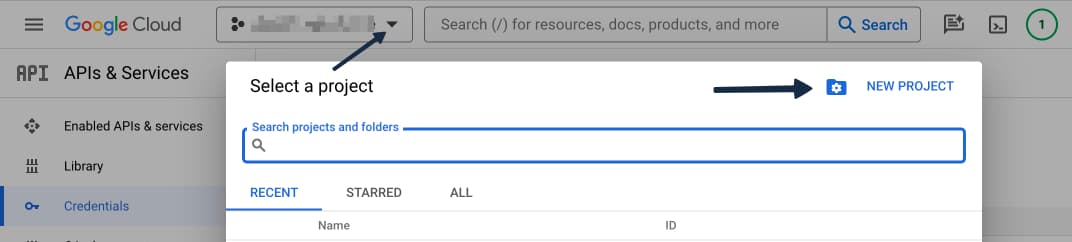
Once in the Google Developers Console, you’ll use the dropdown menu at the top of the page to create a new project. This is a straightforward process, but remember that it may take a few seconds for your new project to be ready.
Enabling the Google Drive API
With your project selected, head to the Library section to find and enable the Google Drive API. This is an important step as it allows your Laravel application to communicate with Google Drive.

Creating credentials
Navigate to the OAuth Consent Screen tab and provide the necessary details. This includes your application’s name, a user support email, and developer contact information. You can leave the other fields as default for the moment.

Scopes and adding test users
The scopes can be left as default, feel free to skip that step. To test properly, add the emails of users who are allowed to test.

Creating OAuth Client ID
In the Credentials section, select Create Credentials and choose OAuth Client ID from the dropdown.

Setting up your web application for OAuth
Choose Web Application as the application type and provide a meaningful name. You’ll also need to add the authorized redirect URI, which for now will be https://developers.google.com/oauthplayground. You’ll need this to get your refresh token; you can remove it later. Click Create and write down your Client ID and Client Secret, as you’ll need them later.

Getting your Refresh Token
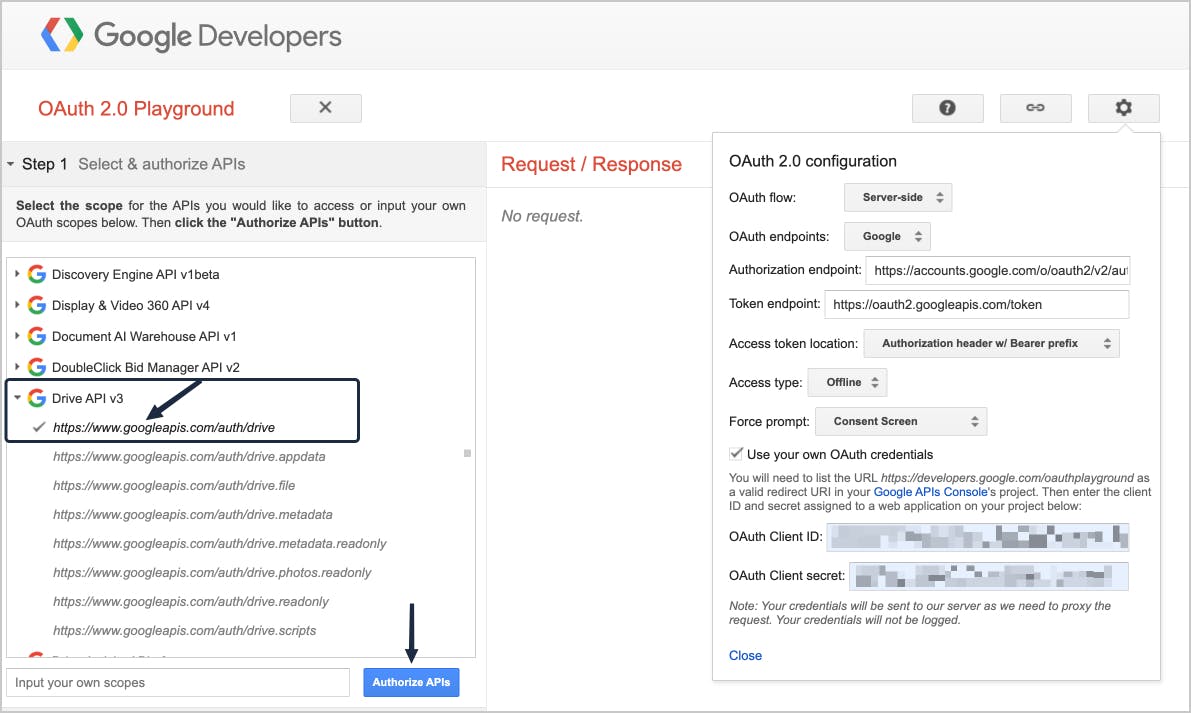
Visit https://developers.google.com/oauthplayground to configure your own OAuth credentials. Enter your Client ID and Client Secret.

Selecting Drive API scope
On the left menu, scroll down to Drive API v3 and select the /auth/drive/ option. Click on Authorize APIs and allow access to your account when asked. You might get some warnings, but it’s fine to keep going.
Auto-refresh your token
After authorizing the APIs, select the option to auto-refresh the token before it expires. Finally, exchange the authorization code for tokens.

Accessing your Refresh Token in step 3
In the last step, you’ll be able to retrieve your refresh token, which is necessary for your Laravel application to communicate with Google Drive. We will need this token when we configure our Laravel application.

Configuring Laravel for Google Drive integration
Now that you’ve got your Google Drive API ready for your Laravel project, the next step is to configure your Laravel application to connect with Google Drive. We’ll show you how to do this in the next article.
Bring Your Ideas to Life 🚀
If you need help with a Laravel project let’s get in touch.
Lucky Media is proud to be recognized as a leading Laravel Development Agency
Technologies
Stay up-to-date
Be updated with all news, products and tips we share!
On this page
- 2025 UPDATE
- Setup Google Drive API for Laravel 12
- Getting your Client ID and Secret
- Creating a new project
- Enabling the Google Drive API
- Creating credentials
- Scopes and adding test users
- Creating OAuth Client ID
- Setting up your web application for OAuth
- Getting your Refresh Token
- Selecting Drive API scope
- Auto-refresh your token
- Accessing your Refresh Token in step 3
- Configuring Laravel for Google Drive integration
- Bring Your Ideas to Life 🚀