Laravel Sanctum Cookie-Based Authentication for SPAs

February 20, 2025 · 6 min read

In this article, we will discuss how to configure Postman to generate tokens through the Laravel Sanctum API and access protected routes. Postman is a popular API client that helps developers make, test, and document API requests. We will try to login, get user data and logout the user from the app. We already explained Laravel Sanctum and how to install it on your project.
Postman vs Insomnia
This article shows you how to set up Postman for testing your API routes. However, you could also use Insomnia or other HTTP clients to do the same thing. They all have similar setups, and you can easily follow our instructions.
SPA Authentication with Laravel Sanctum
To simplify the process we will run the app through the command php artisan serve so we can use the local address http://127.0.0.1:8000/.
Configure your first-party domains
Before starting the authentication process, you need to let Laravel Sanctum know which domains your SPA will be making requests from. In the sanctum configuration file, there’s a stateful option where you can list down all the domains that should be treated as "first-party" domains. These domains will be able to maintain stateful authentication using Laravel session cookies. The default already has the 127.0.0.1:8000 address there so we don't have to make any changes.
use Laravel\Sanctum\Sanctum;

return [

    'stateful' => explode(',', env('SANCTUM_STATEFUL_DOMAINS', sprintf(
        '%s%s',
        'localhost,localhost:3000,localhost:5173,127.0.0.1,127.0.0.1:8000,::1',
        Sanctum::currentApplicationUrlWithPort()
    ))),

    'guard' => ['web'],

    'expiration' => null,

    'token_prefix' => env('SANCTUM_TOKEN_PREFIX', ''),

    'middleware' => [
        'authenticate_session' => Laravel\Sanctum\Http\Middleware\AuthenticateSession::class,
        'encrypt_cookies' => Illuminate\Cookie\Middleware\EncryptCookies::class,
        'validate_csrf_token' => Illuminate\Foundation\Http\Middleware\ValidateCsrfToken::class,
    ],

];
Set up Sanctum middleware
In your bootstrap/app.php file, ensure that you invoke the statefulApi middleware method. This tells Laravel to use session cookies for authentication when requests come from your SPA and to allow API token authentication for third-party requests.
use Illuminate\Foundation\Application;
use Illuminate\Foundation\Configuration\Exceptions;
use Illuminate\Foundation\Configuration\Middleware;

return Application::configure(basePath: dirname(__DIR__))
    ->withRouting(
        web: __DIR__.'/../routes/web.php',
        api: __DIR__.'/../routes/api.php',
        commands: __DIR__.'/../routes/console.php',
        health: '/up',
    )
    ->withMiddleware(function (Middleware $middleware) {
        $middleware->web(append:[
            \App\Http\Middleware\LocaleMiddleware::class,
        ]);

        $middleware->alias([
            'check.author' => \App\Http\Middleware\CheckAuthorStatus::class,
        ]);

        $middleware->statefulApi();
    })
    ->withEvents(discover: [
        __DIR__.'/../app/Domain/Listeners',
    ])
    ->withExceptions(function (Exceptions $exceptions) {
        //
    })->create();
Configure CORS and session cookie settings
You need to publish CORS to make the required changes:
php artisan config:publish cors
Make sure your CORS configuration in config/cors.php is returning the Access-Control-Allow-Credentials header with a value of True. This can be done by setting the supports_credentials option to true. This is important for cross-origin requests to work with cookies.
Need a production-ready Laravel API?
Lucky Media builds Laravel backends with React and Next.js frontends for startups. Let's talk
Initialize CSRF protection
Before your SPA can log in, it needs to get a CSRF token from your Laravel application. This token is used to protect against Cross-Site Request Forgery (CSRF) attacks. You will need to make a GET request to /sanctum/csrf-cookie from your SPA. This will set an XSRF-TOKEN cookie in the browser. We will explain how to test this using Postman below.
Protecting routes with Sanctum middleware
In your routes/api.php file, use the middleware('auth:sanctum') middleware on any routes that should be protected. This ensures that only authenticated requests can access these endpoints.
<?php
use App\Http\Controllers\API\UserController;
use App\Http\Controllers\API\PostController;
use App\Http\Controllers\API\AuthController;

Route::middleware(['auth:sanctum'])->group(function () {
    // Protected User API routes
    Route::get('/users', [UserController::class, 'index']);
    Route::get('/users/{id}', [UserController::class, 'show']);

    // Protected Post API routes
    Route::get('/posts', [PostController::class, 'index']);
    Route::get('/posts/{id}', [PostController::class, 'show']);
});
With this middleware in place, only authenticated requests with a valid Sanctum token can access the protected routes. We created these routes in a previous article named Laravel 11 for Beginners: API Resources. However, this time we have grouped the routes that need to have the Sanctum middleware, so make sure you make these changes on your end.
Postman for SPA authentication
Start by creating a collection with the name of the project you work with, for example Blog. In this collection, you will add all the requests that you need for the authentication process and for making changes to the Blog posts.
Create the blog environment for saving the token data and apiUrl that is needed to simplify the API calls. Click the Environment quick look button on the top right corner and click Add on the Environment section.
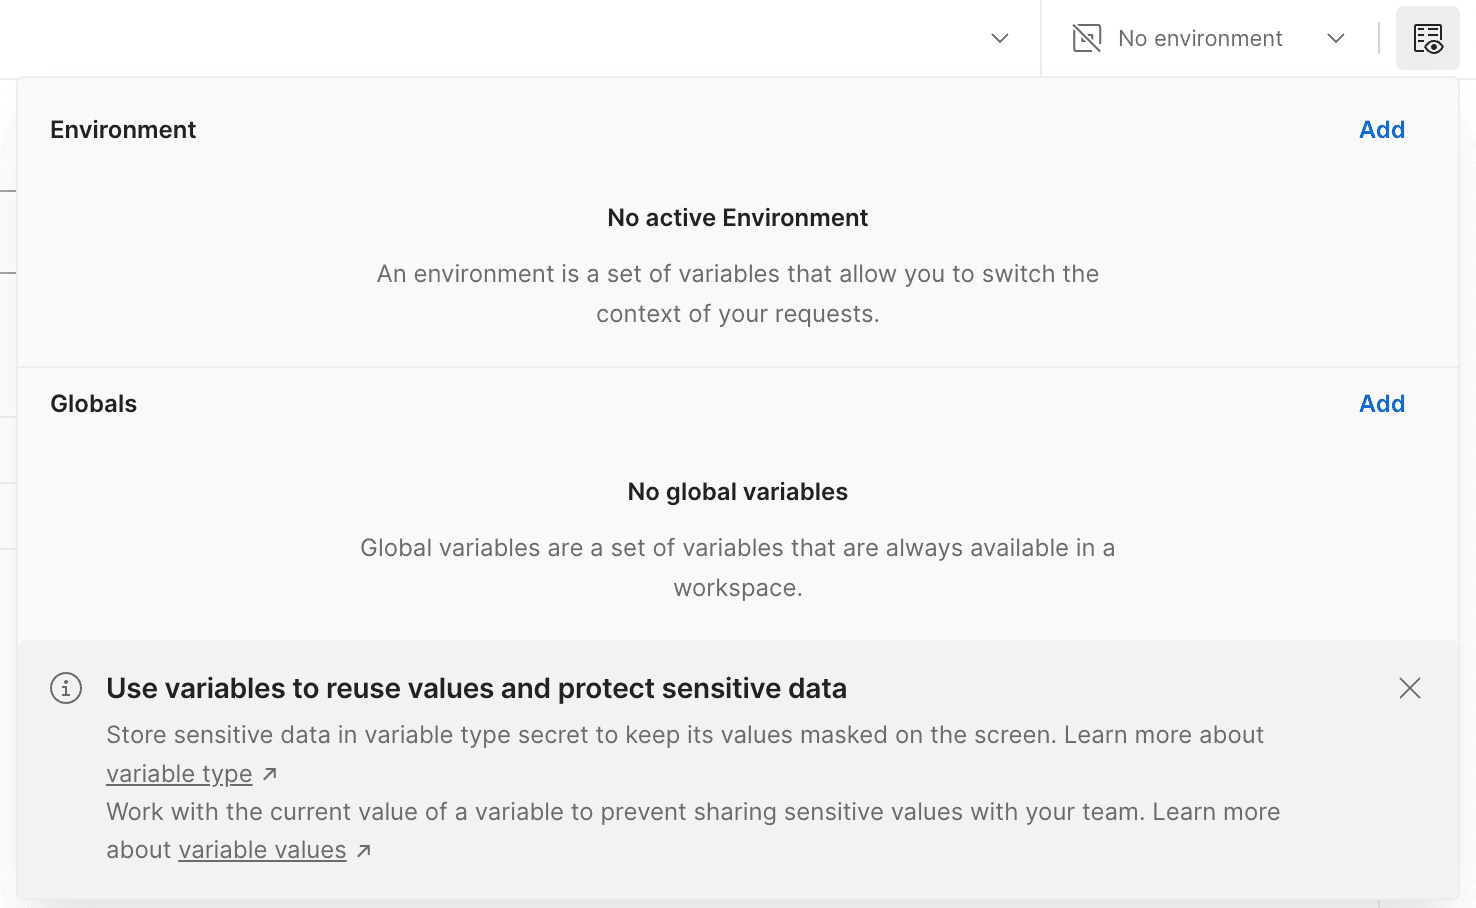
Change the name of the New Environment to blog. Now create two variables, one for the token xsrf-token and another for the apiUrl. Have a look at the image below:

Send CSRF initialization request
Create a new request by clicking on the New button and selecting Request. Change the name of the request to CSRF. By default a GET request is created, just what is needed in this case. Send a GET request to {{apiUrl}}/sanctum/csrf-cookie. Modify the Headers tab to include an Accept key with the value application/json. The Body tab should have None as the selected option.

Click Send and you should receive a Status: 204 No Content response. Check the Headers section and copy the XSRF-TOKEN value. Make sure to copy only the part before the %3D; (see image below).

Now click the top right corner to edit the blog environment (by default No environment option is selected, make sure you have the blog environment selected here) variable for the xsrf-token as you see in the image below:

Login to Laravel with Postman
Now that you have the token you can try the login request. To do this you need to create a new request, change the name to Login and the request type to POST. The address should be {{apiUrl}}/login. Navigate to the Headers tab and add the Accept key with the value application/json, but this time you should also add the X-XSRF-TOKEN key with the value {{xsrf-token}}.
On the Body tab you need to choose form-data and add the email and password for your user.

If you did everything correctly you should receive a Status 200 response and see the page that the user is redirected to after a successful authentication attempt.
Get user data with Postman and Laravel Sanctum
Open your Laravel application and modify the routes/api.php file to include a new route. Let’s use the following example:
use Illuminate\Http\Request;
use Illuminate\Support\Facades\Route;

Route::get('/user', function (Request $request) {
    return $request->user();
})->middleware('auth:sanctum');
The following code will return some information about the user that is currently logged in. Back to Postman, you need to create a new GET request and name it Get User. Change the address to {{apiUrl}}/api/user. This one doesn’t need anything in the Body tab, but for the Headers tab you need to include again the Accept key with the value application/json. You need to add another key as Referer and the value {{apiUrl}}.

Logout the user from Laravel with Postman
Create a new POST request, name it Logout and change the route to {{apiUrl}}/logout. This is similar to the Login request. Navigate to the Headers tab and add the Accept key with the value application/json. Add the X-XSRF-TOKEN key with the value {{xsrf-token}}. Click send and you have logged out from your app.
Conclusion
Now you have all the information you need to create requests for authentication, user data retrieval, and logout. These steps are important for handling single-page application (SPA) authentication.
This article is part of our series Laravel 11 for Beginners: A Step-by-Step Guide to Learn the Concepts.
Bring Your Ideas to Life 🚀
If you need help with a Laravel project let’s get in touch.
Lucky Media is proud to be recognized as a leading Laravel Development Agency
Technologies
Stay up-to-date
Be updated with all news, products and tips we share!
On this page
- Postman vs Insomnia
- SPA Authentication with Laravel Sanctum
- Configure your first-party domains
- Set up Sanctum middleware
- Configure CORS and session cookie settings
- Initialize CSRF protection
- Protecting routes with Sanctum middleware
- Postman for SPA authentication
- Send CSRF initialization request
- Login to Laravel with Postman
- Get user data with Postman and Laravel Sanctum
- Logout the user from Laravel with Postman
- Conclusion
- Bring Your Ideas to Life 🚀